This tutorial provides a step-by-step guide on how to deploy a Rocket Rust web application on a VPS. The tutorial covers all the necessary steps, including acquiring a VPS and domain, setting up domain settings, downloading and installing necessary software on the VPS, and compiling the application. The tutorial also includes helpful tips and troubleshooting advice, making it a useful resource for anyone looking to deploy a Rocket Rust web application on a VPS.
Table Of Contents
Step 1: Acquire a VPS and a Domain
First, you need to figure out where you want to deploy your application. I chose virmach because they offer a dirt cheap $1 linux vps. It gives you 256 MB of memory, 10 GB of disk space, and 500 GB monthly bandwidth, which is more than enough for my needs. I’ve been running my application on the $1 vps for over a year now and have had no issues.
I bought my domain from namecheap because I was able to get an xyz domain name for $1, but it doesn’t matter where you get yours. You can get a free .tk domain name at dot.tk, if you don’t care about the unorthodox extension.
Step 2: Domain Settings
Next, you’ll need to point your domain to your server. You do this by creating an A record that points to the ip address allocated to your VPS. You should also create a CNAME record if you want to be able to prepend www to your domain name.
This will probably appear in the DNS settings for your domain at your domain registrar. For me, I went to namecheap and then went to “advanced dns” for my domain. I added the records like so:
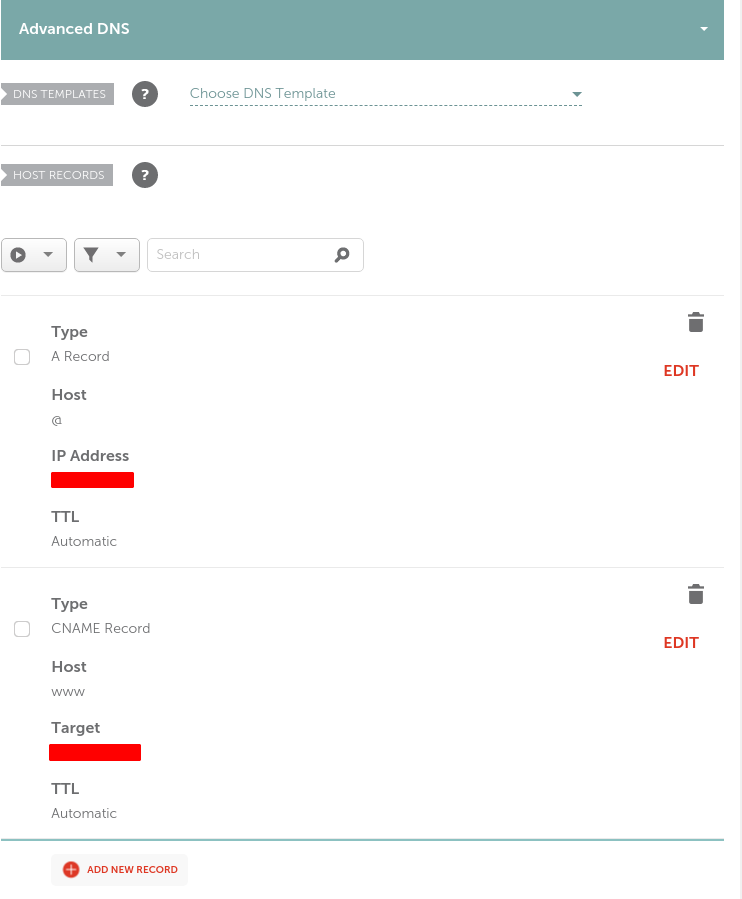
where IP Address is the static IP address of your VPS and Target is your domain name.
It might take awhile for your changes to propagate across the internet, so be patient.
Step 3: Download Software on VPS
I’m going to assume that you’re running something based on debian for simplicity. Downloading and updating packages with other distros will be left as an exercise to the reader.
First, update the list of available packages and then upgrade to the latest versions:
| |
Next, install some necessary packages:
| |
Next, install certbot:
python3 -m venv /opt/certbot/
/opt/certbot/bin/pip install certbot certbot-nginx
ln -s /opt/certbot/bin/certbot /usr/bin/certbot
Lastly, install rust with the following command:
| |
You should run source $HOME/.cargo/env to prepare the rocket rust environment.
If you run into a “RUSTUP_UNPACK_RAM must be larger than X” error, try running export RUSTUP_UNPACK_RAM=X and trying the rust install again.
Step 4: Compile your Application and Create a Systemd Service
Get your source code onto your machine. I’m assuming you know how to do this if you’re using rust. If git isn’t an option, research rsync to copy files from your host machine to your vps. Soon, we’ll be using Github actions to automate this entire process. But for now, let’s make sure we can deploy manually.
cd into your project directory (created with cargo) and compile your project
| |
Next, create a systemd file named /etc/systemd/system/YOUR_DOMAIN.service:
| |
You might not want to use root as the user, depending on your vps. Research systemd and modify it as desired.
Start your service with systemctl start YOUR_DOMAIN.service and enable it to run on system startup with systemctl enable YOUR_DOMAIN.service. Your application should now be running - check with systemctl status YOUR_DOMAIN.service
Step 5: Setup Nginx Webserver
Generate some self-signed SSL certificates:
| |
Put something like this in /etc/nginx/sites-available/YOUR_DOMAIN:
| |
Then, run this command to create a symbolic link:
| |
Check your syntax with nginx -t.
Make sure to delete the default nginx file with rm /etc/nginx/sites-available/default && rm /etc/nginx/sites-enabled/default.
Reload nginx with systemctl reload nginx. Navigate to your domain on your browser with http://YOUR_DOMAIN_NAME. Verify that it’s working.
If everything is working, then go ahead and setup https with certbot --nginx and follow the instructions. If it asks you if you want to redirect http to https, you absolutely should.
Reload nginx with systemctl reload nginx. Navigate to your domain on your browser with https://YOUR_DOMAIN_NAME. Verify that it’s working.
I recommend setting up a cron job to auto renew your https certificates. Run crontab -e and insert this to run the certbot renew script at the first of each month:
| |
Step 6: CI/CD with Github actions
You don’t want to have to manually log into your server, pull your latest changes, build your new binary, and restart your application whenever you push code. We can use Github Actions to automate this.
Each Github actions file is a workflow. Workflows are stored in the .github/workflows directory of your repository.
You will create two workflows:
- rust.yml (build and test)
- deploy.yml (deploy)
You can name them whatever you want.
rust.yml
| |
deploy.yml
| |
Optional: Safer and Easier SSHing into your VPS
I like sshing with RSA keys because you don’t have to enter a password. If you don’t already have a keypair, run the following commands on your host machine (the machine you ssh from)
| |
Use all of the defaults and don’t add a password to your key, unless you want to have to type your password to use it. I’m not super concerned about putting a password on my key because I’ll have bigger things to worry about if someone ever got my key to begin with.
Verify that you can ssh into your machine without a password by running ssh USER@VPS_IP_ADDR.
You can create an ssh profile by editing ~/.ssh/config on your host machine like so:
| |
which will allow you to ssh into your VPS by running ssh PROFILE_NAME.
I also like to disable text passwords to my remote machines so that only I can access them (or anyone with a key). If you also want to do this, set the following options in etc/ssh/sshd_config:
| |